Many businesses today use Google Drive to store company documents, files and folders. At Squaredot, it’s basically our collective virtual memory. But what is the best way to organise files and folders in Google Drive?
We spent quite a while perfecting the internal file & folder architecture of our clients on the Drive. As a result, everybody knows where every file is stored and can access it anytime, anywhere, from any device - whether its Docs, Sheets, Numbers, Slides, or any other file type.
However, after perfecting the internal folder structure, we came across a problem and we’re pretty sure lots of you out there will have the same issue - currently Google Drive does not (easily) allow you to clone a template folder.
Which means that you need to manually create every folder and internal sub folder every time you set up another client account. It’s a royal pain in the … anyway, let’s move on to the best practice of shared folder best practice structure -
Here's the secret code to Google Drive Organisation (you’re welcome!).
What most people don’t know is that Google Drive provides its own scripting service where users can automate actions within their shared Google Drive by executing a script. Using Google Drive Scripts, users can create files and folders, and delete them amongst other processes. This can be very handy especially when creating large folder structures. By having a script to automate this, your team can save precious time doing what they do best instead of managing folders.
Google Drive Organisation tips
Go to https://script.google.com/ here is where we will be coding our script. Save the file with whatever name you’d like and rename the default function “myFunction” to something more descriptive.
Inside the function insert the following code:
Inside the ‘ ‘ we need to put in the client's name. I include a note to the side just letting my colleagues know where to put the client's name. This is the only part of the code that would require updating for different clients.
If you want to populate a specific file you must get the ID of that folder. How? Look at the URL for that folder it should look something like this: https://drive.google.com/drive/folders/XXXXXXXX . The ID for that folder is everything after the /folders/ . Once you have your folder ID we need to get that folder and assign it to a variable, we do this by using the getFolderById method.
<script src="https://gist.github.com/extra-dev/66d959a62667ca209e4352e3f0de3a22.js"> </script>
Now that we have the ID for the master folder and the name of the client we can the parent folder for the client. We use the method addFolder method and add the client folder to the master client folder.
When creating folders using Google Scripts, an extra folder is created in the root drive. Hence, we are going to get the extra root folders and delete them as we go. For this reason I don’t advice stopping the script during debugging or running as the folders in the root drive won’t be deleted. The extra folders will be in the trash, so I would suggest every time you create a new client just empty the trash so it doesn’t all pile up. For this reason we use the getRootFolder and removeFolder methods.
Populating the folder is easy once you have this code down, you just need to repeat it over and over! So create the folder names inside a variable, then add that folder to the parent and remove the extra one created inside the root file.
When testing your scripts keep in mind that Google Drive will execute these even if you are only debugging your code. So don’t click the debug or run buttons constantly otherwise your drive will be full of empty folders! I suggest changing the client name every time your debugging returns no errors this way you know that the script worked and you can move on to adding the next piece of functionality.

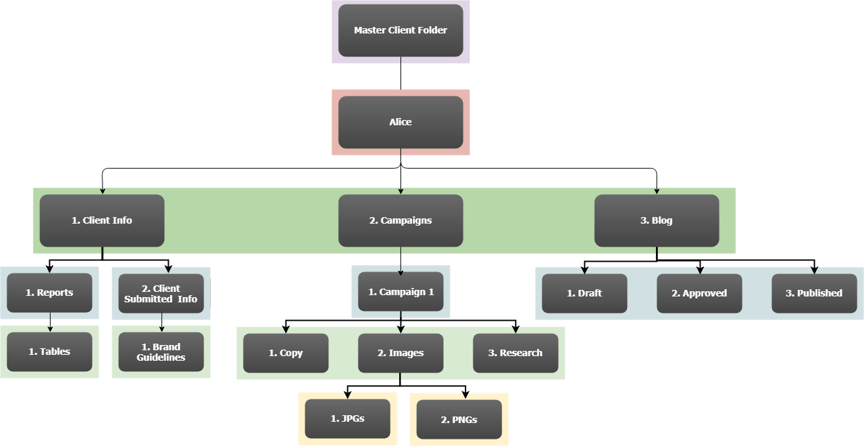
I followed this example file structure and tried to comment my code as much as possible! Below I have provided a gist of the script that you can take a look at.


